Shrinky dinks have been around for quite some time and are a classic crafting activity that many of us may have fond memories of from our childhood. They were popular in the 80s and 90s, but lately, they’ve been making a comeback in the crafting world.
And why not? They’re a fun and easy way to create unique and personalized jewelry, keychains, ornaments, and more.
One of the best things about shrinky dinks is that they’re a versatile craft that can be enjoyed by all ages. With some adult supervision, kids can get in on the fun too, making it a great activity for family crafting sessions or for keeping little ones entertained during a rainy day.
Plus, they make great gifts for friends and family.
The process of creating shrinky dinks is simple yet magical.
You start by drawing or printing a design onto a piece of special plastic paper, and then cut it out to the desired shape and size. The plastic is then heated in the oven or with a heat gun, which causes it to shrink and thicken, creating a sturdy and durable end product.
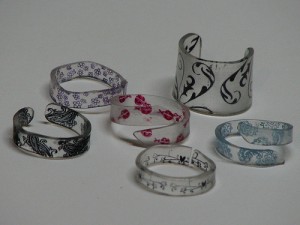
There are countless creative possibilities when it comes to shrinky dinks. You can use them to create custom jewelry, such as earrings, necklaces, and bracelets, or to make personalized keychains, luggage tags, and zipper pulls. You can even create adorable little figurines and ornaments for your Christmas tree.
To get started with shrinky dinks, you’ll need some shrinky dink paper, which you can easily find online or at your local craft store. From there, the possibilities are endless. To help get your creative juices flowing, we’ve rounded up 7 fun and inspiring tutorials to get you started on your shrinky dink crafting adventure.
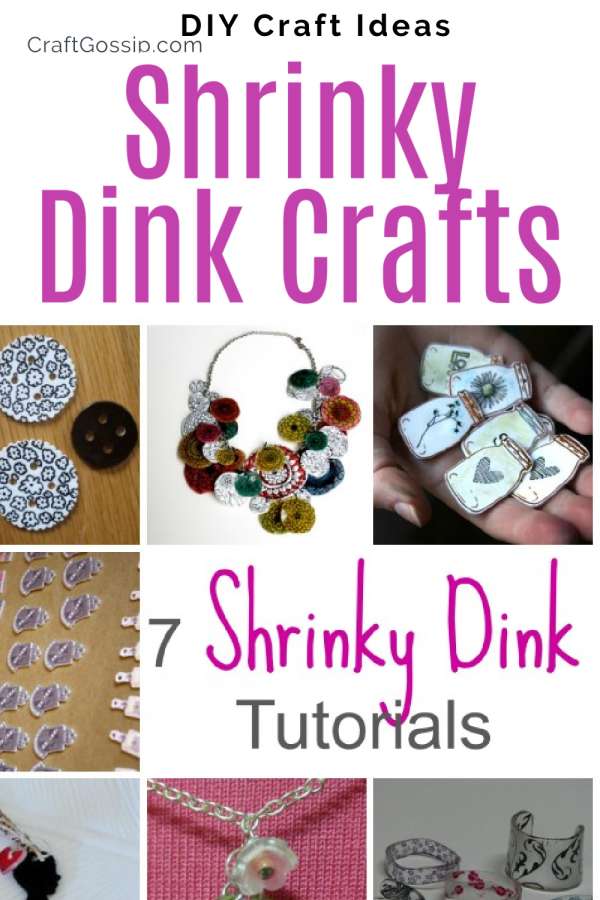
1- Shrink Art Buttons from Craftstylish
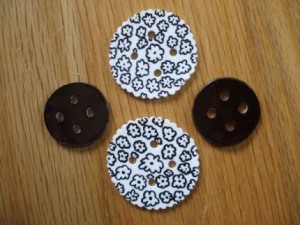
2- Shrink Plastic Statement Necklace from Alisa Burke
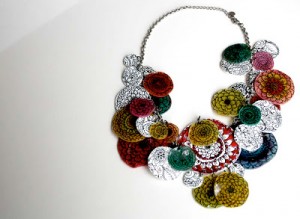
3- Stamped Mason Jar Pendants from Crescendoh
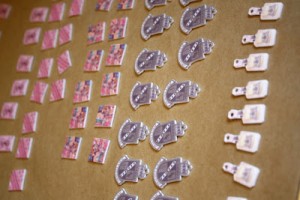
4- Birthday Charms from Saucy Sprinkles
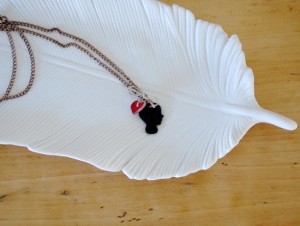
5- Silhouette Pendant from Paper & Stitch
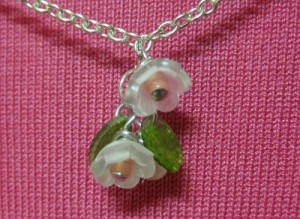
6- Flowers & Leaves Beads from Just Something I Made
7- Stamped Rings from Ink Stains With Roni
I have spent a considerable amount of time working with Shrinky Dink plastic. This versatile material has endless possibilities and is perfect for making a variety of crafts. However, working with it can be a bit tricky at times, especially for beginners. In this bonus sidebar, I’m going to share my tips for working with Shrinky Dink plastic to help you create beautiful and successful projects.
Choose the right plastic: There are different types of Shrinky Dink plastic available in the market, and it’s essential to choose the right one for your project. The most common types are clear , white
 , and frosted
 . Clear plastic is perfect for designs with bright colors, while white plastic is best for designs with a lot of white spaces. Frosted plastic gives a beautiful matte finish and is great for more intricate designs.
Use a sharpie or permanent marker: When designing your Shrinky Dink project, it’s crucial to use a sharpie or permanent marker. Other types of markers or pens may smear or fade when you shrink the plastic, which can ruin your design. Be sure to use a fine-tip marker to make precise designs.
Test your design: Before you start working on your final design, it’s a good idea to test it out on a small piece of Shrinky Dink plastic. This will give you an idea of how your design will look once it’s shrunk, and you can make any necessary adjustments.
Keep the plastic clean: Shrinky Dink plastic is sensitive to oils and fingerprints, so it’s crucial to keep it clean before starting your project. Use a mild soap and warm water to clean the plastic before drying it with a clean cloth. You can also use rubbing alcohol to remove any oils or fingerprints.
Preheat your oven: It’s important to preheat your oven before baking your Shrinky Dink plastic. This will ensure that the plastic shrinks evenly and prevents any warping or uneven shrinking. Follow the instructions on the package to determine the appropriate temperature and baking time for your plastic.
Use a parchment paper-lined baking sheet: To prevent your Shrinky Dink plastic from sticking to the baking sheet, it’s best to line it with parchment paper. This will also help ensure even baking and prevent any warping.
Watch your plastic carefully while baking: While your Shrinky Dink plastic is baking, keep a close eye on it to ensure that it shrinks evenly and doesn’t overcook. If you notice any warping or uneven shrinking, remove it from the oven and try again.
In conclusion, working with Shrinky Dink plastic can be a lot of fun, and with these tips, you’ll be able to create beautiful and successful projects.
Remember to choose the right plastic, use a sharpie or permanent marker, test your design, keep the plastic clean, preheat your oven, use a parchment paper-lined baking sheet, and watch your plastic carefully while baking.
With these tips in mind, you’ll be able to create stunning crafts that will impress everyone.


Leave a Reply