Have you heard about the return of Design Dye? Design Dye is a unique fabric dye option that allows you to treat fabric dyeing just like you would paper crafting. Each sheet of Design Dye acts just like paper–you can cut it with scissors, paper punches, die-cutting machines, and etc. The dye is released by ironing the designs dye side down onto your fabric. The result is bright colorful designs without the hassle of paint, dye, or screenprinting. The dye is currently sold on the website Design Dye and is available in a basic starter kit, which has everything you need to get started. The starter kit includes 16 8×10 sheets of dye in 8 colors, two sheets of precut letters and numbers, a bottle of fabric prep spray, special ironing tissue, sample fabric, and a 20 page design guide.

It’s a lot of great stuff in a single kit, enough to create lots of different designs. It’s also great to have everything you need in a single kit, instead of purchasing it bit by bit. The Design Guide is full of easy to understand directions and ideas. The great thing about it being a paper-like product is how easy it is to start using. If you’ve got scissors, an iron, and an idea, you’re ready to go.
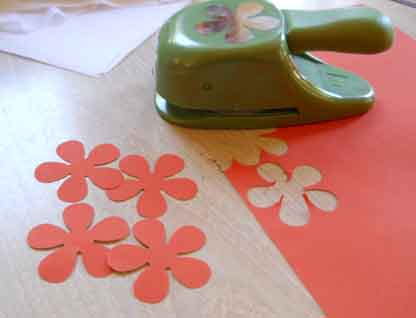
To get a feel for how the Design Dye would work, I punched out a handful of flowers and cut up some squares of different fabrics. The Design Dye guide suggests using Polyester or synthetic materials to achieve optimal results, which was surprising considering most dyes work best on natural fibers. Curious to see what the difference was, I chose four fabrics in different colors and materials and prepared samples with the included prep spray and without. The prep spray is easy to use–simply spray and wait for it to dry (or use a hair dryer if you’re impatient like me). I marked my samples so I’d know which ones were treated, but it wasn’t necessary as the spray acts as a stiffener.
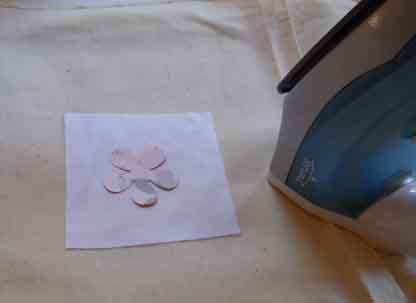
The guide suggests creating a stiff but firm surface by stacking newspapers. Not sure if it’s a necessary measure if you’re working on an ironing board or not, but it worked well on my table. With the design cut out dye side down, you cover it with a piece of the ironing tissue and press for 30 seconds while moving the iron continuously.
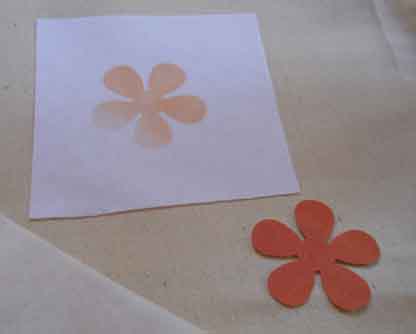
I tried the sample fabric included in the kit, but thirty seconds wasn’t enough for my sample. The gradient effect was pretty cool, but since it wasn’t what I was going for, I replaced the cutout and ironed for another fifteen seconds or so. Once I had the knack of it, the rest went super fast. Seeing your results immediately, without waiting for it to dry, is fabulous.
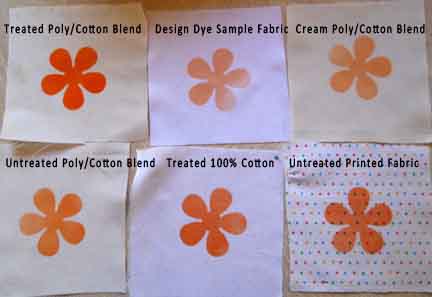
Within 10 minutes, I had all my samples done. As you can see above, the dye took best on the treated white poly/cotton blend. Treating the fabric with the prep spray made a huge difference. Even the treated 100% cotton looked brighter than the untreated polyester fabrics. And I love how the dye maintains a level of transparency, so prints show through your designs.
Overall, the product was super fast to learn to use. Set up was almost nonexistent and it would have been a great craft to do with children. The longest part of the process was drying the fabric after treating it. The hardest was choosing a design. Overall, I was pleased with the results. The color and strength of the outline was just as good as using liquid dye and so much easier to control and clean up.
But Design Dye isn’t just for printing simple shapes on fabric. Check back tomorrow to see what else it can do!
Ready to get your hands on it? Buy it here!


I found out about this stuff last month and I love it. I’ve made a couple personalized t-shirts with it and I agree, there is a lot left over. It is reasonably priced and the delivery was pretty quick.
This is a new product to me that I would love to use in my quilting projects.
Just found out about this product and I am very interested in trying this. I would love to use it on shirts for my girl friends grandchildren, and on canvas bags.
I haven’t tried this yet. But I want it. So I can make shirts for my grandkids. It’s on my “I want” list. LOL
I bought the basic kit and I love the idea, but I am still trying to get it to work. I ironed for over a minute and no transfer at all. I must be doing it all wrong