• Home
  • Suggest A Craft
  • DIY Newsletter

Indie Crafts

Cool and hipster handmade movement

  • About CraftGossip
  • Our Network
    • Bath & Body Crafts
    • Candle Making Ideas
    • Crochet Ideas
    • Cross Stitch
    • Edible Crafts
    • Felting Patterns
    • Glass Art
    • Home & Garden Ideas
    • Indie Crafts
    • Jewelry Making
    • Kids Crafts
    • Knitting Patterns
    • Lesson Plans
    • Needlework
    • Party Ideas
    • Polymer Clay
    • Quilting Ideas
    • Recycled Crafts
    • Scrapbooking
    • Sewing Patterns
    • Card Making
    • DIY Weddings
    • Not Craft Ideas
  • Giveaways
  • Roundups
  • Store
  • Search

Craft Business Tips – Shooting Your Products

September 19, 2016 by Shellie Wilson Leave a Comment

unnamed-2

You can take great DIY product shots with just some simple tools and natural lighting.

Start with the PRODUCTS themselves. Firstly get them looking their best – clean and polish them if

necessary.

Next choose your BACKGROUND.

This will depend on your product and the look you are going for – do you want to create a mood or

present it simply with a black, white or light grey background?

For an authentic feel try to find an environment suitable for the product. For instance leather goods

work well styled on a worn wooden table or use your work environment.

For a very clean and simple look use white, light grey or black. Foam boards are useful as they stay

clean and don’t crease.


For a LIGHT source, nothing beats natural lighting and it’s free, though use it wisely. Find a spot

indoors by a window with indirect light or outside in the shade or even directly outside on an overcast

day. Position the Lightcase so that the light is diffused through the Polypropylene material. Look for a

balanced light across the area of your shoot.

Choose the earlier part of the day for good overall colour.

unnamed-3

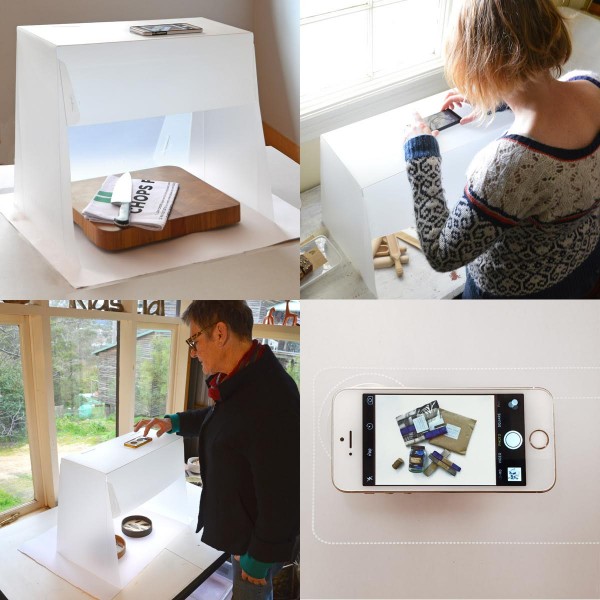
CAMERAS – You can’t beat the quality of a good Digital SLR camera however you can take

remarkably good photographs using a smartphone and a tripod if required. Make sure the camera is

focused, the brightness is adjusted and the camera is steady. Resting the camera on top of the Lightcase

stabilises the camera, but if you are shooting from the front you’ll get the best photos by using a tripod.

There are lots of great apps to edit your images with but you’ll get the best results starting with a great

photo in the first place. Sometimes you can get camera shake when taking photos with your

smartphone – if so, try connecting your headphones and click the button on the headphones to release

the shutter avoiding any camera shake.


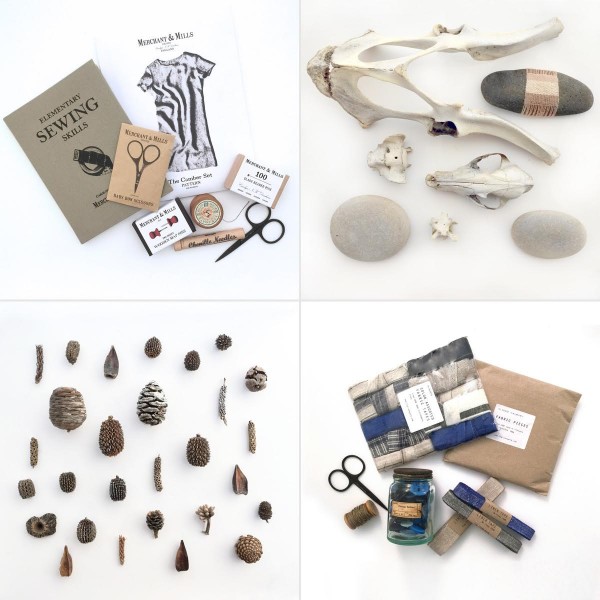
LAYOUT – Make it interesting. Flat lays are a great way of styling your work by introducing other

objects to enhance your products and tell a story. Co-ordinate colour and textures of multiple objects. If

you can ‘t get things to sit in place then stick a bit of blue tack to the undersides.

HAPPY shooting!! Have fun and get creative with your shots! Try placing the Lightcase flatlay over

your hands at work and take a timelapse or instructional video to mix it up a bit and offer something

different to your followers!

unnamed-4

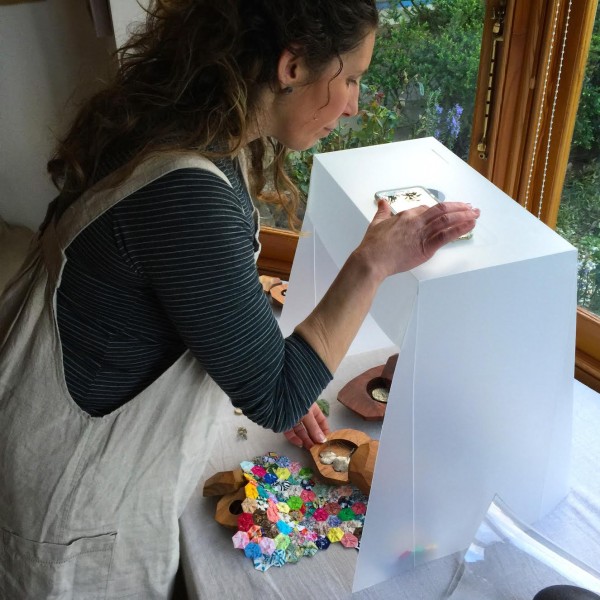
P.S. I have used the newLightcase #Flatlay in the photos above. Lightcase #Flatlay helps you get the

best out of your photography; it diffuses the light giving a balanced and enhanced shooting

environment. It also holds your camera steady and you can go hands free to adjust your shoot live. Slot

a sheet of paper into the back to get a seamless background for front angle photos too.

Lightcase #Flatlay was launched on Kickstarter on September 7th!

Check out our campaign on Kickstarter here.

Read This Next:

  • Mastering Product Photography: Tips for Stunning…
  • Am I Ready To Start Wholesaling My Crafts?
«
»

Have you read?

Mastering Product Photography: Tips for Stunning Etsy Listings

Customer Satisfaction Secrets: Creating a Positive Shopping Experience on Etsy

Crafting a Compelling Etsy Shop Story: Engaging Customers through Authenticity

Am I Ready To Start Wholesaling My Crafts?

Great Customer Service Tips – How To Respond To Broken Items

Leave a Reply

Your email address will not be published. Required fields are marked *

Independent Crafters Information

On the Indie Crafts section of CraftGossip I like to support other indie artists by posting tips about running a handmade business, blogging and other helpful information. Once a week I try to feature handmade shops to showcase their work. I also like to share trendy, popular DIY's that I think are amazing and hope you do as well. If you are an Independent Artist or want to start a handmade business, this is the place to find resources. Or if you just love DIY's and everything crafty I hope you'll find some fun projects to make and be inspired by the artists I feature!

Explore

adult coloring art blog blog handmade business christmas coloring craft fair diy Etsy free printable halloween Indie artist indie business kids link up Roundups shop handmade tips tutorial

RSS More Articles

  • Learn about Chile for Kids
  • Handmade with a Past: Tuesday’s Top Recycled Etsy Find
  • 12 Handmade Cards with Ink Blending Techniques
  • How to Make a DIY Moss Bunny Wreath for Easter
  • DIY Tic-Tac-Toe Flannel Board – Fun and Portable Game
  • Knit a Sweet Hood Covered with Flowers
  • Cross Stitch for the Beach
  • 25 Genius Ways to Repurpose Old Chairs Into Something Beautiful and Useful
  • Discover the ultimate collection of 22 Positive Quilt Patterns
  • 25 Crochet Flower Patterns For Spring

Pick Your Blog

  • Sewing
  • Knitting
  • Quilting
  • Crochet
  • Home & Garden
  • Recycled Crafts
  • Scrapbooking
  • Card Making
  • Polymer Clay
  • Cross-Stitch
  • Edible Crafts
  • Felting
  • Glass Art
  • Indie Crafts
  • Kids Crafts
  • Jewelry Making
  • Lesson Plans
  • Needlework
  • Bath & Body
  • Party Ideas
  • Candle Making
  • DIY Weddings
  • Not Craft
  • Free Craft Projects

Copyright © 2025 · CraftGossip | Start Here | Contact Us | Link to Us | Your Editors | Privacy and affiliate policy